Home Automation is great, especially when it works seemlessly using your voice as a command or a sensor as an automation, but from time to time, you want to press a button, or check the status of a sensor, view a camera or check the weather. This blog, is all about that!
This, is possible the most fun part of Home Assistant for me for a couple of reasons. Firstly, its so customisable, from different layouts, to cards, to colours, icons, you want it, someone has probably thought about it already too. Its also something that is actively being worked on by the Home Assistant development team to make it even more user friendly.
Dashboard Use Case
When designing a dashboard, the first thing that you’ve got to ask yourself is who is going to use it, what are they going to use it for, and on what device are people going to access it with. I say this, because you want to avoid a situations like this:
- Design a dashboard that is accessible on an ipad, that your child can can access to disable the door sensor on the sweet cupboard
- You design a wall-mounted dashboard that uses really tiny buttons that are really difficult to control with your fingers a.k.a sausage fingers
You saw a few examples of some really cool dashboards in my ‘Getting to grips with the basics‘ blog which are done by some really talented folk with a lot of experience. However you needn’t be a seasoned UX designer to get a really user friendly and pretty dashboard.
If you’re wanting to build something for your phone, Home Assistant have an app which is pretty full-featured and as long as you’ve thought about your design, can be very handy.
The way that Home Assistant created dashboards is effectively a bunch of columns that can be populated with cards. Cards can be a means to display a statistic, a status or a controllable card for turning on a light, or a TV but its important to understand how a dashboard is ‘structured’ as such.
Getting started with Cards
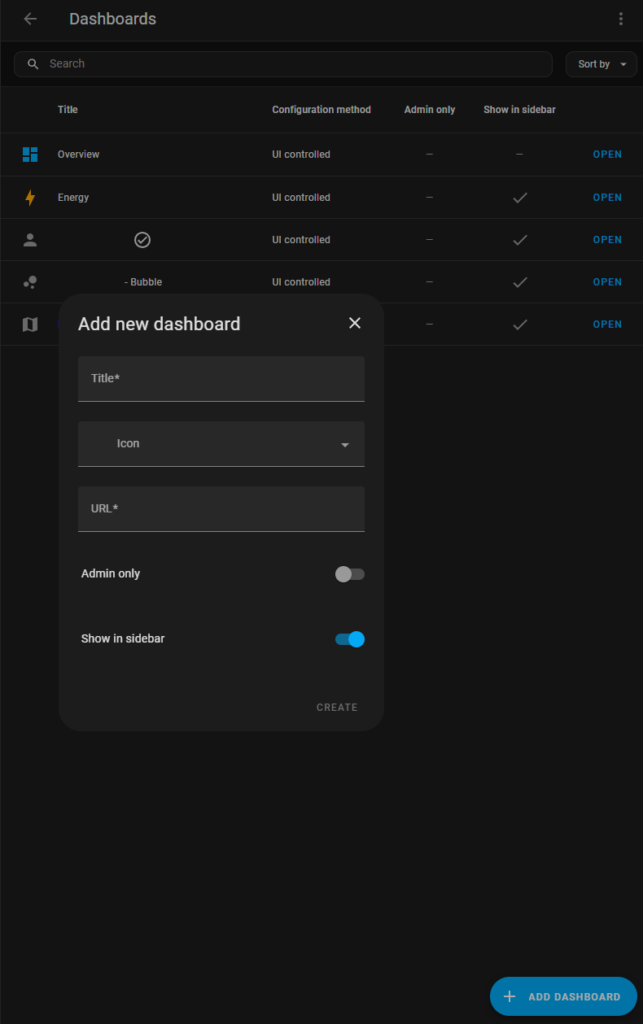
Getting started with a new dashboard is super simple, go into Settings > Dashboards and click the ‘Add Dashboard’ button in the bottom right hand corner. Give the Dashboard a name, and icon if you’d like, and the url field will auto-complete (but you can change the URL if you’d prefer). Decide whether its an admin-only dashboard and whether you want it on your sidebar, and thats pretty much it.

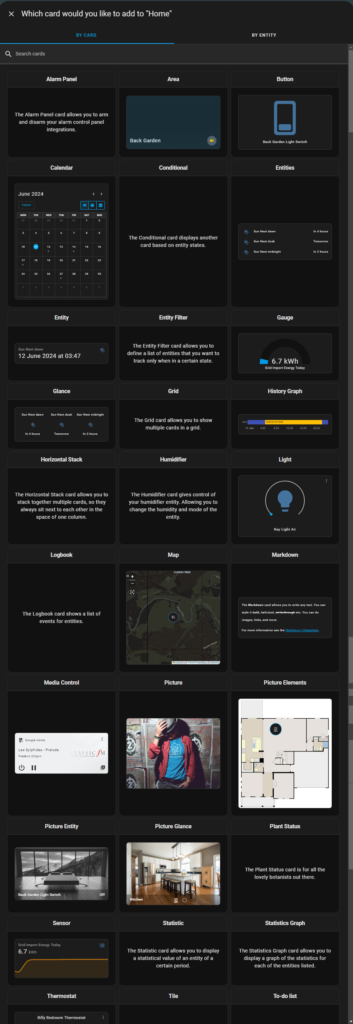
So you’ve got a new clean dashboard with nothing on it, lets see what we can do! This is where the world becomes your oyster. Home Assistant comes with a plethora of different card options,:

These range from cards displaing simple entities, their status and the ability to toggle or change them (perfect for lighting or switches), guages for monitoring your solar production or energy usage, media control cards for your TV or speakers, and some much more complex ones.
There is no right or wrong answers here, I found it was a matter of playing to see which made most sense for the functionality of the entity
Entity / Entities
I would recommend these for simple ‘boolean’ type devices, whether these be smart plugs (on/off) or simple lights or bulbs. I use these card extensively across my dashboard (well, a community one that is super similar) and honestly – they’re probably the easist one to use. The only different between the cards is that the Entity card is limited to 1 entity, whereas the Entities card can handle multiple. Check out the video below for a quick show of both buttons
I will also add, I use this for status’ of open and closed doors (where I have sensors) and where cameras detect motion, so it doesnt have to be for a light switch or whatnot.
Thermostat Card
This is a super simple card, as it does what it says on the tin, and if you’ve got smart heating in your house, whether that be Hive, Nest, Ecobee, Honeywell – it works super simple. Wherever you have a thermostat, you can add the card (it looks like the below out of the box).
The temperature in the big font is the ‘target’, and the smaller font is the ‘actual’. You can adjust the temperature (or override your schedules) by simplying moving the white circle to your desired temperature. Super simple, but does the job perfectly.

Media control
This card is super handy, particularly when you’ve got smart speakers dotted around your house. Typically these will be picked up by HA on initial setup, but you can control addons such as this to give basic functionality over things like Echo Dots such as play/pause/stop, artist and song name etc.
Personally, this type of card is more useful on a wall-based tablet because if I’m honest I’d use my phone to control music on things such as Spotify but for a quick pause, or skip, this is realy useful.

Vertical and Horizonal Stack
This card I think I use more than any other, because it essentially lets you stack other card types ‘on top’ of it. Lets use my dashboard as an example:

This is the top of my dashboard, and I actually use 2 different horizonal stacks here, with the entity card within them. It maximises the horizontal space available on my phone, rather than having to scroll loads and having lots of white space (or in this case, dark grey space 😛 )
Vertical stack does exactly the same, except keeps the card within the ‘stack’ in the same column. This is less applicable for me as my phone dashboard is a single column, but is very handy on a wall-mounted dashboard where you may have 3-4 columns of cards.
All the card’s I’ve shown you above are ones that come part of Home Assistant, but it would be amiss for me not to mention the community developed cards – which arguably are far more functional. This is not an exhaustive list by any stretch, but there are a few here that I use very regularly.
Mushroom
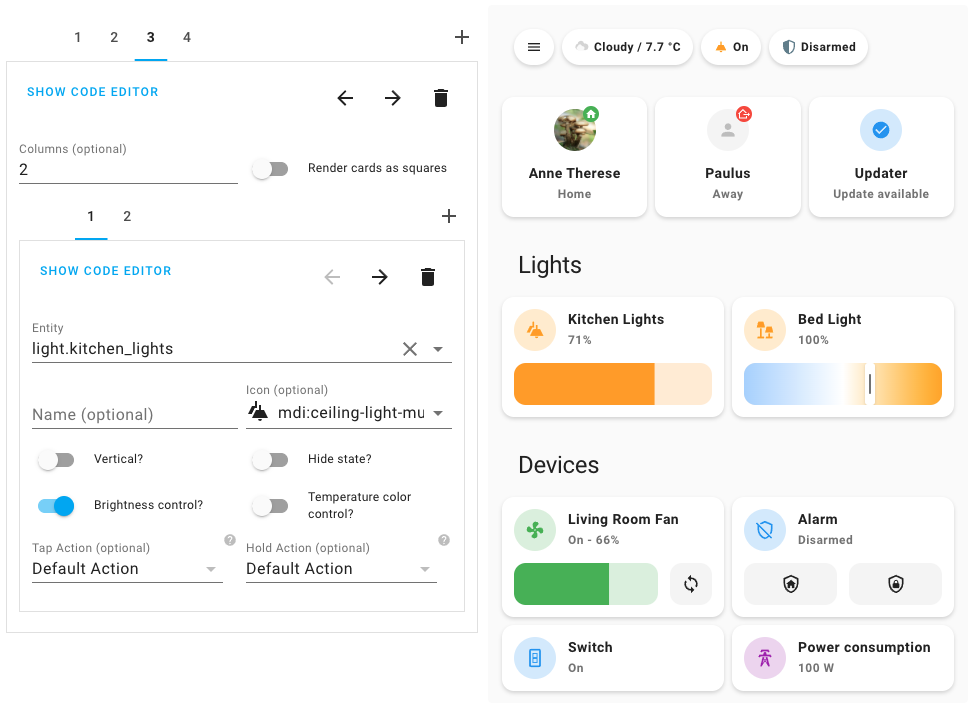
Mushroom is a collection of cards that are highly customisable, giving you options arounds light and dark colour schemes, icon picker and quite frankly, are very pretty. You can see me making use of them at the top of my dashboard providing the weather and the amount of electricity I’ve imported and exported, but as you can see from the image below, you can use it to creat some lovely buttons to control dimmable lights, support for user location and many others. I really like that fact it allows you to show the entity status underneath the name of the entity, perfect for something like a sensor or an alarm state.
Mushroom is installed using a third party integration called HACS which has 100s of community-born integrations, plugs and themes – they’ll be a future blog on this!

ApexCharts
Everyone loves a really good chart right? Well if you’re looking to see whether or not the temperature in your bedroom has been consistent over the day, or how much solar power you’ve produced over the last month, or even whether you want to track the price of your electricity ApexCharts can help you out. Again, installable via HACS, this is very handy

Bubble-Card
Much like Mushroom cards, Bubble-Card is a collection of cards, but provide a ‘pop-up’ feature – essentially providing you with a small button to a pop-up window with more cards displayed. I have been working on a new dashboard which makes use of this, and seems to be perfect for a mobile phone where screen real estate is low. I really like how it has all your shortcuts along the bottom of the screen – just makes things super accessible, and the buttons look really minimalistic too, and aesthetic I rather like.
Other cards
There’s a few other cards that I’ve made use of for specific purposes, in particular one to give me a quick look at my Home Battery status (battery percentage, etc). I use GivTCP Battery Card for this as I think it gives the best ‘at a glance’ status:

I also use another card (Trashcard) which you guys have probably seen on my dashboard a few times, which, at a glance gives me a view of which bins are going to be collected on a specific day. This is fully automated and uses an API into my local council with my specific location, but I think it does a great job.

Lastly, I also use Frigate Card, a highly customisable card to allow me to view my cameras live, but also snapshots and clips with minimal clicks. Its very snappy, and also is aware of zones that I’ve marked to ignore on my cameras (such as the road outside my house). You can see that briefly in the Bubble card video above.
I think cards are a perfect example of how community driven Home Assistant is. Yes, a lot of them you need to use HACS (third party store), but there are literally thousands of addons available to perfectly customise your dashboard, for your use case, on your device.

